Autonomous Google Ads: The End of the PPC Agency Model?
Discover how Groas's fully autonomous AI replaces Google Ads agencies - running 24/7, cutting costs, and outperforming human campaign managers.
March 22, 2026
•
5
min read
Last updated: February 12, 2026
If your conversion tracking is broken, nothing else matters. Not your bidding strategy. Not your keyword selection. Not your ad copy. Not the most sophisticated AI optimization tool on the planet. Every decision your Google Ads account makes, whether by a human or an algorithm, is only as good as the data feeding it.
And in 2026, conversion tracking is more broken than most advertisers realize. Between browser cookie restrictions (Safari limits cookie lifespans to 1 to 7 days, Firefox blocks third-party cookies entirely), privacy regulations (GDPR, CCPA/CPRA, and new state-level laws rolling out through 2026 and 2027), ad blockers (used by roughly 30% of internet users), and cross-device behavior (the average conversion path now spans 2 to 3 devices), the gap between actual conversions and tracked conversions has widened to the point where many advertisers are optimizing on data that captures only 50% to 70% of their real performance.
This guide walks you through the complete 2026 conversion tracking stack, from GA4 setup through enhanced conversions, Consent Mode V2, and server-side tagging. It is written for marketers who need to get this right, not developers. But where technical implementation is required, we include the exact steps and code.
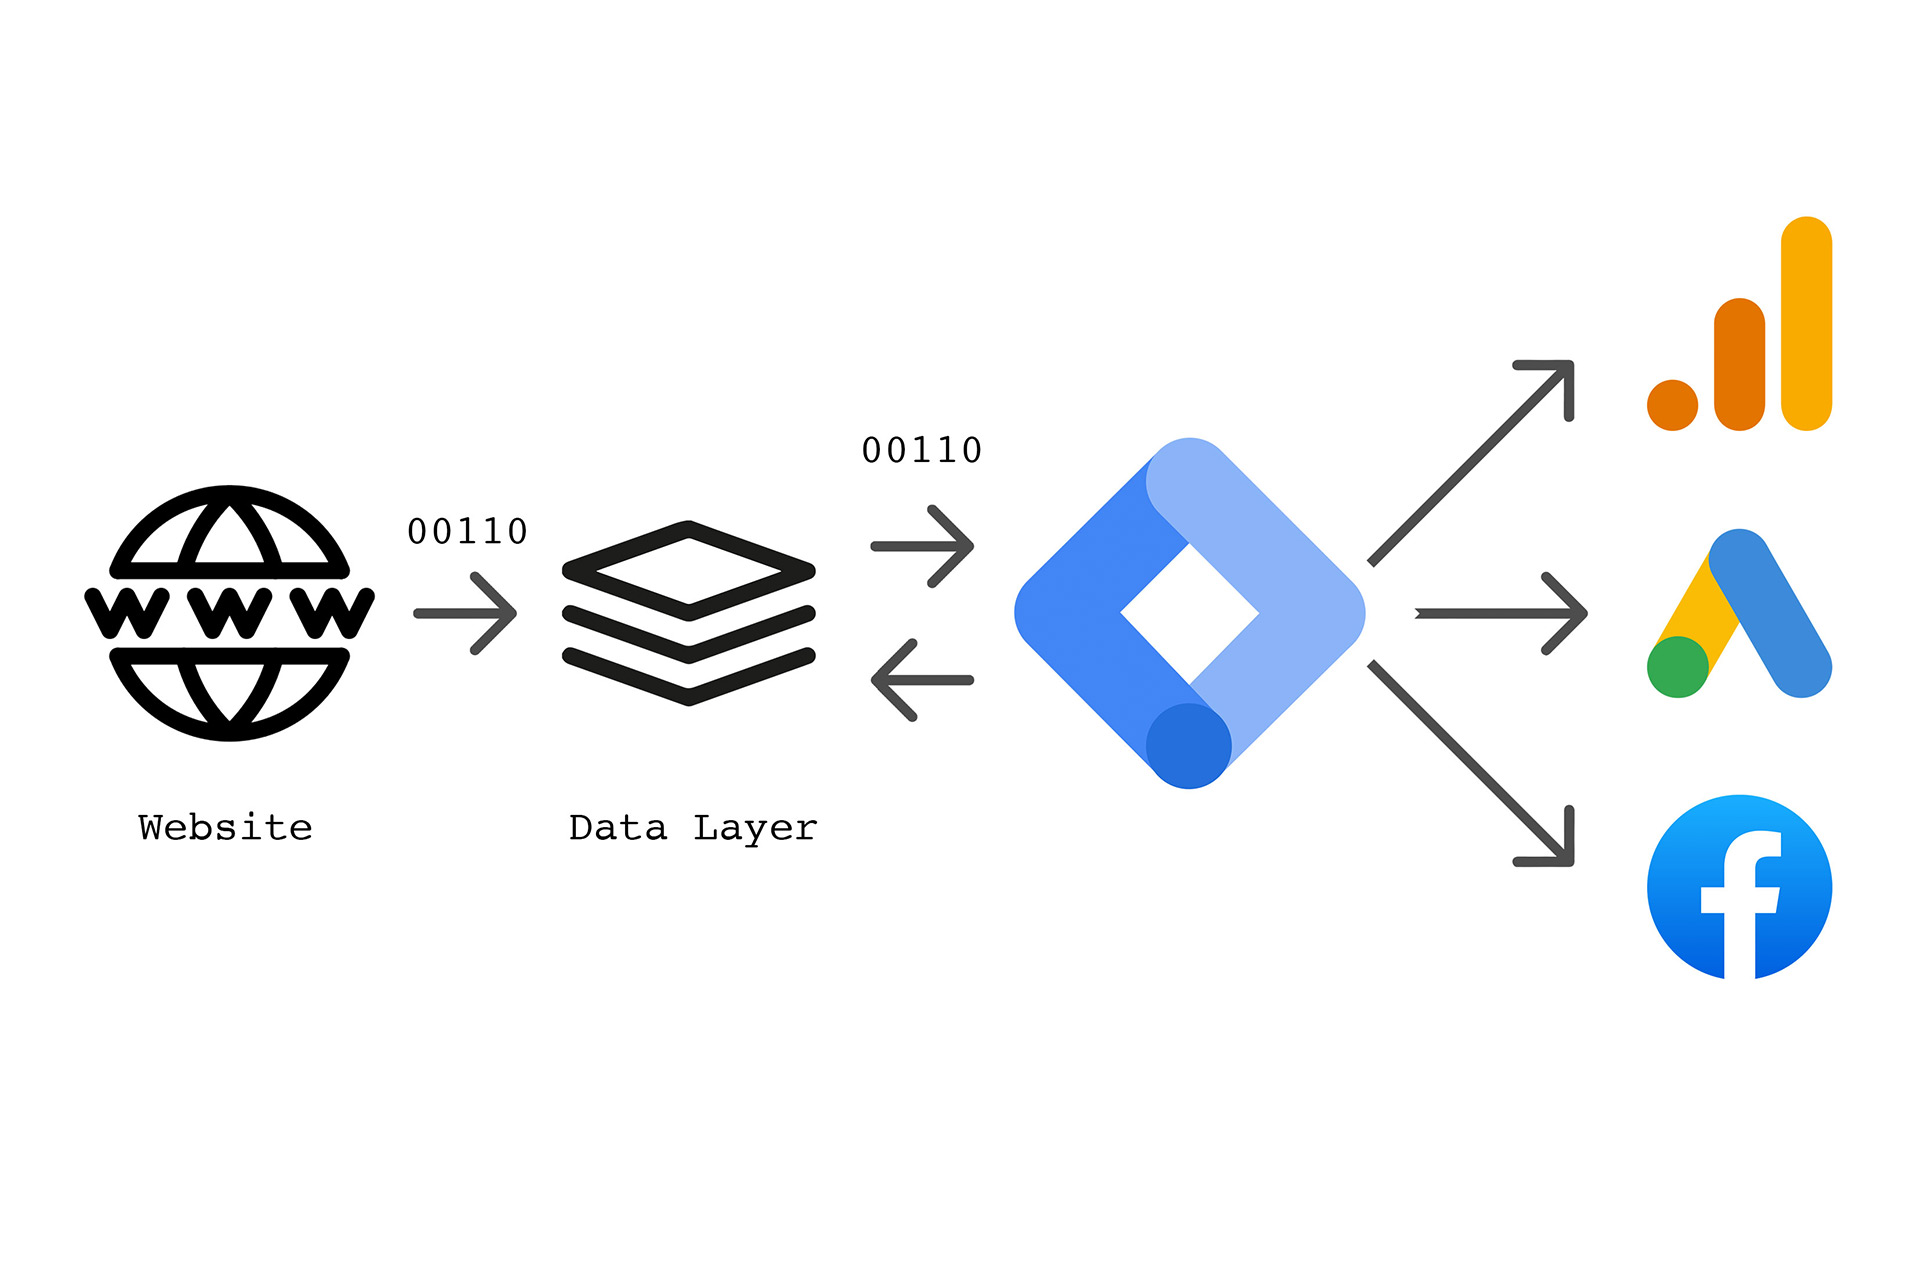
If you are starting from scratch or need to verify your existing setup, here is the foundational layer.
If you do not already have a GA4 property, create one in your Google Analytics account under Admin. Each website should have its own data stream. When creating your web data stream, enable Enhanced Measurement, which automatically tracks scrolls, outbound clicks, site search, video engagement, and file downloads without any additional tagging.
You have two options for installing the Google tag on your website: directly via the gtag.js snippet, or through Google Tag Manager (GTM). We strongly recommend Google Tag Manager for almost every business. GTM gives you the flexibility to manage all your tags, triggers, and variables from a single interface without touching your website code, and it makes testing and debugging dramatically easier.
To install via GTM, create a Google Tag Manager account and container if you do not already have one. Add the GTM container snippet to every page of your website (the code goes in the head and body sections). In GTM, create a new tag with the type "Google Analytics: GA4 Configuration." Enter your GA4 Measurement ID (it starts with "G-" and you can find it in your GA4 property under Admin, then Data Streams). Set the trigger to "All Pages." Publish the container.
To verify the tag is working, use the GTM Preview mode (click Preview in the top right of your GTM workspace) or install the Google Tag Assistant browser extension. Navigate to your website and confirm the GA4 configuration tag fires on page load.
GA4 uses an event-based model rather than the old Universal Analytics goal system. Every user interaction is an event, and you mark specific events as conversions. The key events you should track as conversions depend on your business type.
For ecommerce, the critical conversion events are "purchase" (completed transactions), "begin_checkout" (checkout initiated), and "add_to_cart" (product added to cart, tracked as a micro-conversion). For lead generation, track "generate_lead" (form submission), "contact" (phone call or chat initiated), and "schedule" (appointment booked). For SaaS, track "sign_up" (trial or account creation), "subscription" (paid conversion), and "first_value" (first meaningful product usage).
To mark an event as a conversion in GA4, go to Admin, then Events, find the event you want to mark as a conversion, and toggle the "Mark as conversion" switch. For events that GA4 does not automatically track (like form submissions on custom forms), you will need to create custom events either through GTM or through GA4's event creation interface.
This is the bridge that allows conversion data to flow from GA4 into Google Ads for optimization. In GA4, go to Admin, then Product Links, then Google Ads Links. Click "Link" and select your Google Ads account. Enable auto-tagging in your Google Ads account (under Settings, then Account Settings) to ensure that Google can track which ad clicks lead to which conversions.
Once linked, you can import GA4 conversion events into Google Ads. In Google Ads, go to Tools and Settings, then Conversions, then click the plus button. Select "Import" and choose "Google Analytics 4 properties." Select the conversion events you want to import.
A critical warning: do not track the same conversion in both GA4 and Google Ads native conversion tracking simultaneously, or you will double-count conversions. Choose one source and stick with it. If you are using GA4 events imported into Google Ads, ensure your Google Ads native conversion tags for the same actions are either removed or set to "Secondary" (not "Primary") conversion actions.
GA4 defaults to data-driven attribution (DDA), which uses machine learning to distribute conversion credit across touchpoints based on your actual data. For 90% of advertisers, this is the right choice in 2026. Data-driven attribution is significantly more accurate than last-click, which systematically over-credits branded search and under-credits upper-funnel activity.
In Google Ads, you can set the attribution model for each conversion action under Tools and Settings, then Conversions. Select the conversion action, click Edit Settings, and choose your attribution model. Use data-driven attribution unless you have a specific strategic reason not to.
Enhanced conversions are the single most impactful improvement you can make to your conversion tracking accuracy in 2026. If you implement only one thing from this guide, make it this.
When a user converts on your website (makes a purchase, fills out a form, signs up), they typically provide first-party data such as an email address, phone number, or mailing address. Enhanced conversions capture this data, hash it using the SHA-256 algorithm (converting it into a string of characters that cannot be reversed back to the original data), and send the hashed data to Google.
Google then matches this hashed data against its own logged-in user data to connect the conversion to the ad click that initiated it. This works even when cookies have been deleted, when the user switched devices between clicking the ad and converting, when the conversion happened days or weeks after the initial click, or when the user is browsing in Safari or Firefox with aggressive cookie restrictions.
The practical impact is significant. Advertisers implementing enhanced conversions typically see a 5% to 15% increase in reported conversions, not because they are getting more actual conversions, but because they are now measuring conversions that were previously invisible. This matters enormously for automated bidding, because Smart Bidding strategies like Maximize Conversions and Target ROAS can only optimize toward conversions they can see.
Here is the step-by-step process for setting up enhanced conversions through GTM.
Step 1: Enable enhanced conversions in Google Ads. Go to Tools and Settings, then Conversions, then Settings. Under "Enhanced conversions," click "Turn on enhanced conversions." Accept the Customer Data Terms (this is a one-time acknowledgment that you will handle customer data in accordance with Google's policies). Select "Google Tag Manager" as your implementation method.
Step 2: Configure user-provided data collection in GTM. In Google Tag Manager, navigate to your Google Ads Conversion Tracking tag (or your GA4 Configuration tag if you are using GA4 events imported into Google Ads). Within the tag configuration, find the section for "User-provided data" or "Enhanced conversions." You need to tell GTM where to find the user's data on your conversion pages.
There are two methods for providing user data: automatic collection and manual configuration.
Automatic collection is the simplest approach. When you enable it, Google's tag automatically scans your conversion pages for form fields containing email addresses, phone numbers, names, and addresses. It identifies these fields, hashes the data, and sends it to Google. This works well for standard form layouts and ecommerce checkout pages. To enable automatic collection, in your Google Ads Conversion tag settings, check the box for "Include user-provided data from your website." Select "Automatic" as the detection method.
Manual configuration gives you more control and is more reliable for non-standard page layouts. You create Data Layer variables in GTM that explicitly capture the user data you want to send. Here is how:
First, push user data to the data layer on your conversion pages. You or your developer need to add a small script to your thank-you or confirmation page that pushes the user's data into the GTM data layer. The code looks like this:
dataLayer.push({'event': 'purchase','user_data': {'email': 'customer@example.com','phone_number': '+1234567890','address': {'first_name': 'Jane','last_name': 'Smith','street': '123 Main St','city': 'Austin','region': 'TX','postal_code': '78701','country': 'US'}}});
The values should be dynamically populated from your form submission or order data. You do not need to hash the data yourself; GTM handles hashing automatically before sending it to Google.
Second, create Data Layer variables in GTM for each piece of user data. Go to Variables, then New, select "Data Layer Variable." For email, set the variable name to "user_data.email." For phone, use "user_data.phone_number." Create variables for each data point you are capturing.
Third, configure the user-provided data in your Conversion tag. In your Google Ads Conversion Tracking tag (or GA4 Event tag), find the "User-provided data" section. Select "Manual configuration" and map each variable to the corresponding field (email, phone, first name, last name, street, city, region, postal code, country).
Step 3: Verify the setup. Use GTM Preview mode to test. Submit a test conversion on your website. In the Preview panel, click on the conversion event and inspect the tag. You should see the user-provided data variables populated with the values from your test submission. The data should appear as hashed values in the tag output.
In Google Ads, you can verify enhanced conversions are working by going to Tools and Settings, then Conversions, selecting your conversion action, and checking the Diagnostics tab. Look for "Enhanced conversions: Active." Google recommends waiting 72 hours after implementation before checking diagnostics.
A healthy implementation shows 50% or more of conversions enhanced. Below 30% typically indicates that your data capture is not working on all conversion paths and needs investigation.
If your business generates leads rather than ecommerce transactions, enhanced conversions for leads works slightly differently. Instead of matching conversion data at the point of sale, it matches the lead submission data (typically an email address from a form fill) and then tracks whether that lead eventually converts to a customer.
This requires uploading your CRM data to Google Ads (showing which leads converted to customers) so that Google can optimize toward the leads most likely to convert, not just the leads most likely to submit a form. Setting this up involves configuring enhanced conversions as described above, then additionally setting up offline conversion imports from your CRM to Google Ads. This is a more advanced configuration but is essential for any B2B or high-consideration business where the initial lead submission is not the actual business outcome you are optimizing toward.
Consent Mode is where conversion tracking meets privacy compliance, and getting it right in 2026 is non-negotiable for any business serving users in Europe. Even for US-only businesses, implementing Consent Mode provides meaningful tracking benefits.
Consent Mode V2 is Google's mechanism for adjusting how Google tags (Analytics, Ads, etc.) behave based on each user's consent choices. When a user visits your site and interacts with your cookie consent banner, their choices are communicated to Google's tags through Consent Mode, which then adjusts tracking behavior accordingly.
Consent Mode V2 manages four consent types: "analytics_storage" controls whether Google Analytics can set cookies for visit tracking. "ad_storage" controls whether Google Ads can set cookies for advertising data. "ad_user_data" controls whether user data can be sent to Google for advertising purposes. "ad_personalization" controls whether data can be used for remarketing and personalized ads. The last two ("ad_user_data" and "ad_personalization") were added in the V2 update in November 2023 and are required for compliance with the Digital Markets Act.
If you serve users in the European Economic Area (EEA) or UK and use any Google advertising or analytics products, Consent Mode V2 implementation has been mandatory since March 2024. Without it, Google will stop populating remarketing audiences, cannot model conversions from unconsented users, and may restrict access to ad personalization features.
For US-only businesses, Consent Mode V2 is not legally required in most states as of early 2026, but implementing it is still beneficial. Safari and Firefox restrict cookies globally, not just in Europe. State privacy laws in California, Colorado, Virginia, Connecticut, and several other states create domestic data handling requirements. And conversion modeling (which requires Advanced Consent Mode to function) improves tracking accuracy regardless of legal jurisdiction.
This distinction is critical and frequently misunderstood.
Basic Consent Mode blocks all Google tags until the user gives consent. If a user clicks "Reject" on your cookie banner, you get zero data from that visit. Google has no signals to model behavior. This keeps you technically compliant but destroys your data.
Advanced Consent Mode is the recommended approach for almost every business. When a user rejects cookies, Google tags still load but operate in a "cookieless" mode, sending anonymous pings to Google without setting any cookies or transmitting identifying information. These cookieless pings provide enough aggregate data for Google to build conversion models that estimate the conversions you are missing from unconsented users.
The practical impact is enormous. With global cookie acceptance rates averaging around 31%, Basic Consent Mode means losing data on roughly 69% of your traffic. Advanced Consent Mode recovers a significant portion of that lost data through modeling. Use Advanced Mode unless your legal counsel has specific objections.
Consent Mode V2 requires two components: a Consent Management Platform (CMP) to present the cookie banner and capture user choices, and the Consent Mode configuration in your Google tags to respond to those choices.
Step 1: Choose a Google-certified CMP. Google requires that you use a CMP that is integrated with the IAB Transparency and Consent Framework (TCF) and is Google-certified. Major certified CMPs include CookieScript, Termly, Cookiebot, OneTrust, and CookieYes, among others. Your CMP handles the cookie banner design, user choice recording, and consent signal transmission.
Step 2: Set default consent state. Before a user interacts with your consent banner, you need to define the default consent state. For EEA/UK users, all consent types should default to "denied." For US users, you may default to "granted" depending on your legal requirements.
If you are using GTM, you can set the default consent state using the Consent Initialization trigger (which fires before any other triggers). Create a Custom HTML tag with the following code and set it to fire on Consent Initialization:
gtag('consent', 'default', {'analytics_storage': 'denied','ad_storage': 'denied','ad_user_data': 'denied','ad_personalization': 'denied','wait_for_update': 500});
The "wait_for_update" parameter tells Google tags to wait up to 500 milliseconds for the CMP to load and update the consent state before firing. This prevents tags from firing in the default denied state if the CMP just needs a moment to load.
Step 3: Update consent state based on user choice. When the user interacts with your consent banner (accepting or rejecting), your CMP needs to communicate the updated consent state to Google tags. Most Google-certified CMPs handle this automatically through their integration with Consent Mode. When the user clicks "Accept," the CMP fires a consent update that changes the relevant parameters from "denied" to "granted," and Google tags begin full tracking.
The update call looks like this (though your CMP will typically handle this):
gtag('consent', 'update', {'analytics_storage': 'granted','ad_storage': 'granted','ad_user_data': 'granted','ad_personalization': 'granted'});
Step 4: Verify implementation. Use the Google Tag Assistant browser extension or GTM Preview mode to verify that consent signals are being transmitted correctly. When you load a page before interacting with the consent banner, you should see the default denied state. After accepting cookies, you should see the consent update to granted.
In Google Ads, you can check whether Consent Mode is working by looking at your conversion diagnostics. If conversion modeling is active (shown in your conversion action settings), Consent Mode is transmitting signals correctly.
For Google to model conversions from unconsented users (the primary benefit of Advanced Consent Mode), your account needs to meet minimum thresholds: at least 700 ad clicks over 7 days per country and domain, 7 full days of data collection, and a reasonable consent rate (typically 20% or higher helps with model accuracy). If your account falls below these thresholds, modeling may not activate.
A note for publishers and advertisers using the IAB Transparency and Consent Framework: TCF v2.3 replaces v2.2, and publishers and CMP vendors had until February 28, 2026 to migrate. Google accepts v2.3 since October 2025. If your CMP has not been updated to support v2.3, contact your CMP provider to ensure compliance.
Server-side tagging is the most technically complex layer of the tracking stack, but it provides the most robust data collection for businesses that need maximum accuracy.
In traditional (client-side) tagging, tracking scripts run in the user's browser. The browser sends data directly to Google, Meta, and other platforms. This means the data is subject to ad blockers (which block requests to known tracking domains), browser cookie restrictions (Safari's 7-day cookie expiration, Firefox's total cookie protection), and page load impact (each tracking script adds weight to your pages).
Server-side tagging adds an intermediate step. Instead of the browser sending data directly to Google, it sends data to your own server first. Your server then forwards the data to Google and other platforms. Because the data flows through your domain, ad blockers cannot distinguish it from regular website traffic. Because cookies are set by your server (as first-party cookies on your own domain), browser restrictions on third-party cookies do not apply. And because processing happens on the server, your page load times improve.
Server-side tagging is not necessary for every business. It adds cost and complexity. Consider it if you are losing significant data to ad blockers (common in tech-savvy audiences where ad blocker usage can exceed 40%), your audience heavily uses Safari (common in markets with high Apple device usage), you need extended cookie lifespans beyond what client-side cookies provide, you are spending $10,000 or more per month on Google Ads and the improved data accuracy meaningfully impacts optimization, or you operate in an industry where maximum data accuracy is essential (finance, healthcare, high-consideration B2B).
Server-side tagging requires a server to process the data. Google provides a Cloud Run option on Google Cloud Platform. For a medium-traffic website (100,000 to 500,000 monthly sessions), expect to pay roughly $50 to $150 per month for server costs. Higher-traffic sites may pay more. There are also managed server-side tagging solutions (like Stape) that simplify setup and start at approximately $20 per month for lower-traffic sites.
Setting up server-side tagging involves creating a server container in Google Tag Manager (separate from your web container), deploying the server container to Google Cloud Platform or a managed hosting provider, configuring a custom subdomain for your server container (something like "analytics.yoursite.com" or "data.yoursite.com"), updating your web container's GA4 Configuration tag to send data to the server container URL instead of directly to Google, and configuring server-side tags in the server container to forward data to Google Analytics, Google Ads, and any other platforms you use.
The detailed implementation is beyond the scope of this guide (it requires developer involvement or significant technical comfort), but the key point is that server-side tagging sits on top of your existing GA4 and enhanced conversions setup. It does not replace those layers; it makes them more robust.
After reviewing hundreds of Google Ads accounts, these are the tracking mistakes we see most frequently.
This happens when you track the same conversion action in both Google Ads native conversion tracking and GA4 imported conversions. If you have a Google Ads conversion tag firing on your thank-you page AND a GA4 "purchase" event imported as a conversion in Google Ads, every purchase gets counted twice. Your reported CPA looks half of what it actually is, and your bidding algorithms optimize toward phantom data.
The fix: Pick one source of truth for each conversion action. If you use GA4 events imported into Google Ads, remove or set the Google Ads native conversion tag for the same action to "Secondary." Never have both set as "Primary."
Your team visits your own website constantly. If you are not filtering internal traffic, your analytics data includes employee visits, developer testing, and QA sessions. For small businesses, this can meaningfully skew your data.
The fix: In GA4, go to Admin, then Data Streams, select your stream, click "Configure tag settings," then "Define internal traffic." Add your office IP address(es). Then go to Admin, Data Settings, Data Filters, and activate the internal traffic filter.
The most common enhanced conversions issue is that the user-provided data is not being captured on conversion pages. This happens when automatic detection fails to find form fields (common on custom-designed checkout pages), when the data layer push is not configured correctly for manual implementation, or when the conversion page loads before the data layer is populated.
The fix: Use GTM Preview mode to test a real conversion flow. Submit a test form or complete a test purchase. In the Preview panel, check whether the user_data variables are populated. If they are empty, your data capture is not working. For automatic detection, inspect your form fields to ensure email and phone inputs have recognizable names or IDs. For manual configuration, verify that your data layer push fires before the conversion tag.
If auto-tagging is turned off in your Google Ads account, Google cannot properly track which ad clicks lead to which conversions. This is the most basic tracking requirement and it is surprising how often it is disabled, usually because someone turned it off years ago to use manual UTM parameters and never turned it back on.
The fix: In Google Ads, go to Settings, then Account Settings. Ensure "Auto-tagging" is enabled.
Many advertisers serving EEA/UK users either have not implemented Consent Mode at all (risking data collection blockages) or have implemented Basic Consent Mode (losing all data from unconsented users). Both result in significant data gaps.
The fix: Implement Advanced Consent Mode using a Google-certified CMP as described in Part 3 of this guide. The difference between Basic and Advanced can mean the difference between capturing 31% and 70% or more of your conversion data.
Google Ads defaults to a 30-day click-through conversion window, but many businesses have sales cycles shorter or longer than 30 days. If your conversion window is too short, you miss late converters. If it is too long, you attribute conversions to clicks that may not deserve credit.
The fix: Look at your actual time-to-conversion data in Google Ads (under Tools and Settings, then Attribution, then Paths). Set your conversion window to capture 90% to 95% of your conversions. For ecommerce, 7 to 14 days is often appropriate. For B2B or high-consideration purchases, 60 to 90 days may be needed.
Many accounts still use last-click attribution, which over-credits bottom-of-funnel keywords (especially brand terms) and under-credits discovery and consideration campaigns. This leads to budget misallocation that systematically underfunds the campaigns driving genuine incremental growth.
The fix: Switch to data-driven attribution in your conversion action settings. Google has made DDA the default for new conversion actions, but older accounts may still have last-click enabled.
After implementing your complete tracking stack, here is a systematic verification process.
GA4 Real-Time Report. Go to GA4, then Reports, then Real-Time. Open your website in a new browser tab (or use a private/incognito window). Navigate around your site and complete a test conversion. You should see your page views and events appearing in the real-time report within seconds. If you see nothing, your GA4 tag is not firing.
GTM Preview Mode. Open GTM and click Preview. Enter your website URL. Navigate through your site and complete a test conversion. In the Preview panel, verify that your GA4 Configuration tag fires on every page, your Conversion tag fires on the thank-you or confirmation page, user-provided data variables are populated for enhanced conversions, and consent signals show the correct state (denied before consent, granted after accepting).
Google Ads Tag Diagnostics. In Google Ads, go to Tools and Settings, then Conversions. Click on each conversion action and review the Diagnostics tab. Look for "Tag status: Active" (your conversion tag is firing), "Enhanced conversions: Active" (enhanced conversions are working, check after 72 hours), and any warnings or errors that need attention.
Google Tag Assistant. Install the Google Tag Assistant browser extension. Navigate to your website and check that all tags are detected and showing green (healthy) status. Red or yellow indicators flag issues that need investigation.
Consent Mode Verification. Use Google Tag Assistant or GTM Preview to verify that consent signals are being transmitted. Load a page without interacting with the cookie banner and confirm the default denied state. Accept cookies and confirm the consent update to granted. Reject cookies and confirm that tags operate in cookieless mode (for Advanced Consent Mode).
Here is why we wrote this guide. Every optimization strategy, every bidding algorithm, every autonomous AI system (including groas) makes decisions based on conversion data. If that data is incomplete, every decision built on top of it is compromised.
When 30% of your conversions are invisible because enhanced conversions are not set up, your Smart Bidding thinks your campaigns are performing worse than they actually are. It pulls back spend on campaigns that are actually profitable. It shifts budget toward campaigns where conversions are easier to track, not toward campaigns that generate the most revenue.
When Consent Mode is missing and you lose data on 69% of your EEA traffic, your audience signals are skewed, your remarketing lists are smaller than they should be, and your conversion-based bid strategies are optimizing on a minority of your actual performance.
Fixing your tracking is the single highest-ROI activity you can do in Google Ads. It costs relatively little (a few hours of setup, possibly a small monthly cost for server-side tagging), and it makes everything else you do more effective.
This is also the only prerequisite for groas. Once your conversion tracking is accurately capturing your business outcomes, groas can take over everything else: bid management, budget allocation, negative keyword management, search term analysis, and performance optimization. All autonomously, all in real time. But it needs accurate data to work with. No AI system, no matter how sophisticated, can optimize toward conversions it cannot see.
Get your tracking right first. Then let the AI handle the rest.
GA4 conversions are events tracked within Google Analytics that you have marked as conversion events. Google Ads conversions are tracked either through Google Ads' own conversion tags or by importing GA4 conversion events into Google Ads. The key rule is to avoid tracking the same conversion in both systems as a "Primary" conversion, which causes double-counting. Most advertisers should either use GA4 events imported into Google Ads or use Google Ads native conversion tags, but not both for the same action.
Enhanced conversions send hashed first-party customer data (email, phone number, address) to Google alongside conversion events. Google matches this data against its logged-in user base to attribute conversions that would otherwise be lost due to cookie restrictions, cross-device behavior, or delayed conversions. Advertisers typically see a 5% to 15% increase in reported conversions after implementing enhanced conversions. This additional data improves Smart Bidding accuracy because the algorithm can see and optimize toward a more complete picture of actual performance.
Consent Mode V2 is legally mandatory for advertisers serving users in the EEA and UK. For US-only advertisers, it is not strictly required as of early 2026, but implementing it is still beneficial. Safari and Firefox restrict cookies globally, not just in Europe. Several US states (California, Colorado, Virginia, Connecticut, and others) have privacy laws that create data handling requirements. And Advanced Consent Mode enables conversion modeling that improves tracking accuracy regardless of jurisdiction. Several more states have privacy laws taking effect in 2026 and 2027, making early implementation a smart investment.
Basic Consent Mode completely blocks all Google tags until the user gives consent. If the user rejects cookies, you get zero data. Advanced Consent Mode allows Google tags to send anonymous, cookieless pings even when consent is denied. These pings do not set cookies or transmit identifying information, but they provide enough aggregate data for Google to model the conversions you are missing from unconsented users. Advanced Mode recovers significantly more data than Basic Mode while remaining privacy-compliant.
In Google Ads, go to Tools and Settings, then Conversions. Click on your conversion action and check the Diagnostics tab. Look for "Enhanced conversions: Active." Google recommends waiting 72 hours after implementation before checking. A healthy implementation shows 50% or more of conversions enhanced. Below 30% indicates your data capture needs fixing. You can also use GTM Preview mode to verify that user-provided data variables are being populated during test conversions.
Server-side tagging is not necessary for every business. It adds cost ($20 to $150 per month depending on traffic volume and hosting approach) and technical complexity. It is most valuable for businesses losing significant data to ad blockers, those with audiences that heavily use Safari, businesses spending $10,000 or more per month on Google Ads where improved data accuracy meaningfully impacts ROI, and industries requiring maximum tracking precision. For businesses spending under $5,000 per month, enhanced conversions plus Advanced Consent Mode typically provide sufficient tracking accuracy without the added complexity of server-side tagging.
Start with enhanced conversions. It provides the most significant accuracy improvement with the least complexity. If you implement only one thing from this guide, make it enhanced conversions. Next, implement Consent Mode V2 (especially if you serve European users). Finally, add server-side tagging if your business justifies the additional investment. This prioritization is based on impact per hour of implementation effort.
Every AI-driven optimization tool, including groas, makes decisions based on conversion data. If your tracking captures only 50% of actual conversions, the AI is optimizing toward an incomplete and potentially misleading picture of your performance. Accurate tracking is the single most important prerequisite for effective AI optimization. Once your tracking correctly captures your business outcomes, autonomous tools can manage everything else (bidding, budgeting, negative keywords, performance monitoring) with confidence that the data they are working from represents reality.
Yes, but there are important nuances. If you use both GA4 and Google Ads conversion tracking, make sure enhanced conversions is set up consistently across both. Note that conversions measured by importing GA goals (from the old Universal Analytics) are not supported for enhanced conversions. Only GA4 event-based conversions imported into Google Ads support enhanced conversions. Follow Google's guidance on combining GA4 and Google Ads conversion tracking to avoid double-counting.
After implementation, allow approximately 30 days before evaluating full impact. The enhanced conversions feature needs time to build up matched conversion data and for Google's systems to incorporate the improved data into reporting and bidding optimization. You can verify that the feature is working within 72 hours (check the Diagnostics tab), but the performance impact on your campaigns takes longer to materialize.